Mac Os X 10.12 Download
For the first time in several years, Apple stopped supporting macOS Sierra for some computers. Such a decision of the visitor
was caused by a number of incompatibilities and weaknesseshardware. However, for many MacBook users the reason does not seem compelling. The counterargument is that some computers for an obscure reason passed the option, while their more powerful contemporaries (such as the MacBook Pro) mysteriously ended upwards behind.
Co-ordinate to i version, Apple thus enhancesrequirements in order to stimulate the buy of new devices. Other irrefutable circumstances entailing the emergence of unsupported computers are missing. Often this version is justified - with a few tweaks and additions, a tool from dosdude ane called macOS Sierra Patcher solves the problem of the "incompatibility" of many computers with this version of the operating system. In this guide, we'll show you how to install macOS ten.12 Sierra on older versions of the Mac, which, co-ordinate to the manufacturer, are incompatible with this operating system.
Ad
Ad
Today'due south list of devices supporting macOS 10.12 Sierra includes:
- MacBook (Late 2009);
- iMac (Late 2009);
- MacBook Air (2010);
- MacBook Pro (2010);
- Mac Mini (2010);
- Mac Pro (2010).
For comparing, it is worth looking at the table with a list of computers on which it is possible to install Sierra using macOS Sierra Patcher: 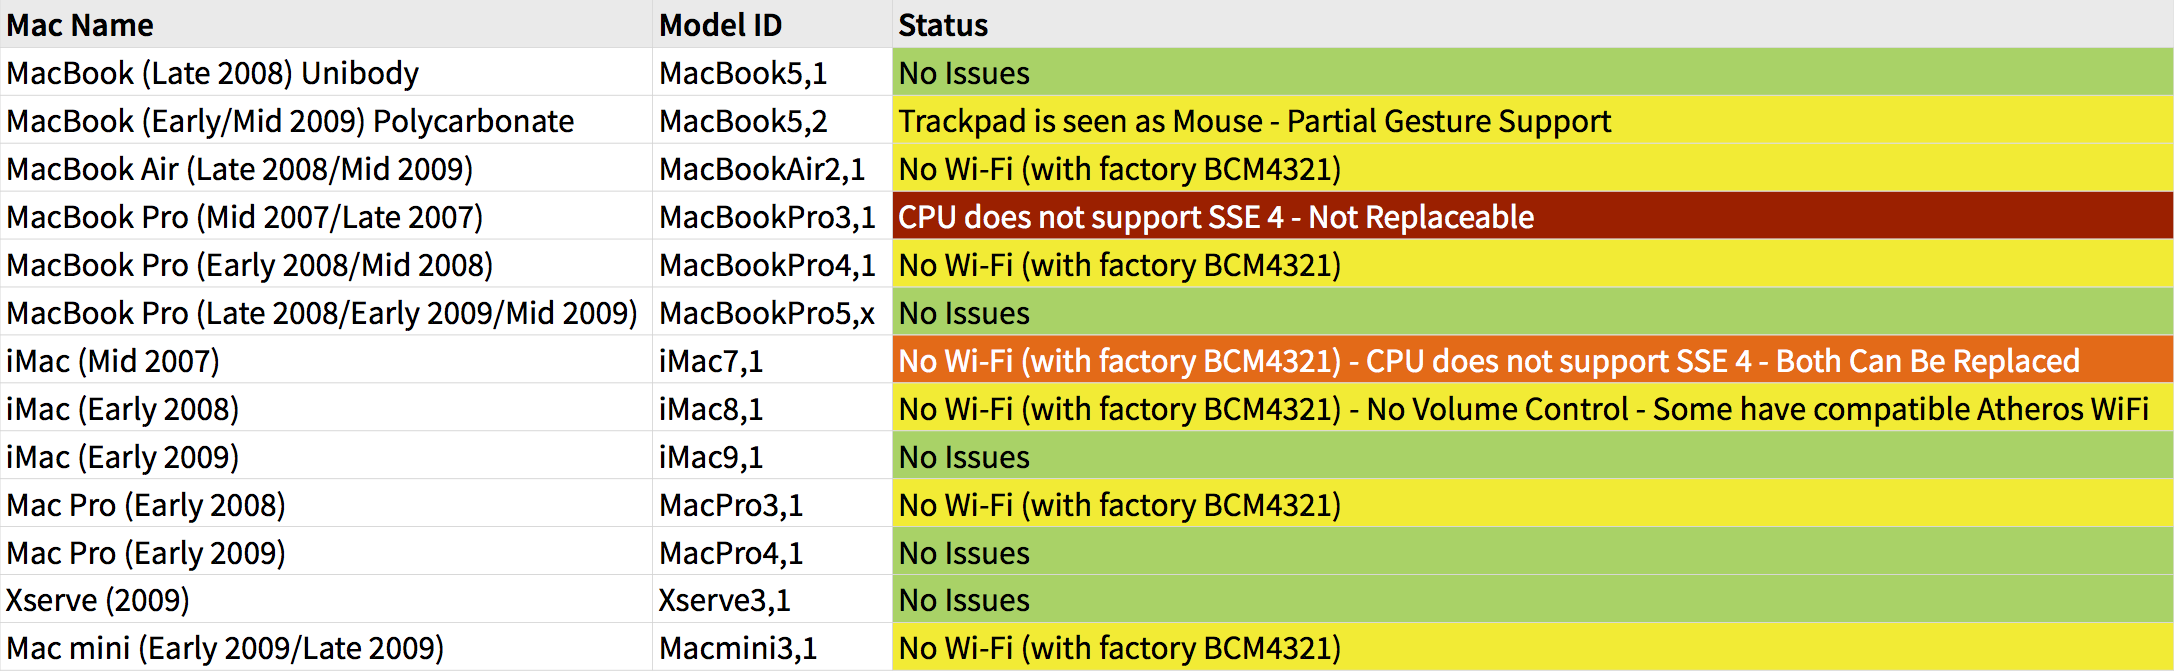

It is worth noting that in the case ofspecific computers, according to the table, bug may occur. The most common is the lack of Wi-Fi due to the presence of an incompatible BCM 4321 menu in some devices. The problem is often solved by replacing the card. Other devices (such as the MacBook Pro (2008/9) work and so well that they do not require any modifications and only make you lot wonder why Apple found them incompatible.
Advertising
Advert
Using one of the models listed in the table and want to test Sierra on information technology? Follow our instructions for creating a modified installer.
MacOS Sierra installation instructions for unsupported Mac versions
1) Detect a wink bulldoze with a capacity of 8 GB or create a partition on an external hard drive.
2) Format with the GUID division table and Mac Os Extended file system through the Disk Utility application.
3) Download a re-create of macOS Sierra 10.12. To download it through the App Store, you volition need access to a supported machine. Nevertheless, downloading directly or through a macOS virtual machine circumvents this limitation.
4) Make sure the Install macOS Sierra awarding that you downloaded is located in the / Applications folder.
5) Download macOS Sierra Patcher from the programmer dosdude.
half dozen) Disable SIP on the machine where you are goinginstall sierra. SIP must exist disabled throughout the installation and even after it. Do not worry: although this somewhat reduces the level of security, this is not the end of the world, and Os versions prior to El Capitan do not include SIP at all.
To disable SIP, reboot your Mac into the recovery section of your electric current OS Ten, launch Terminal and run the post-obit command - "csrutil disable".
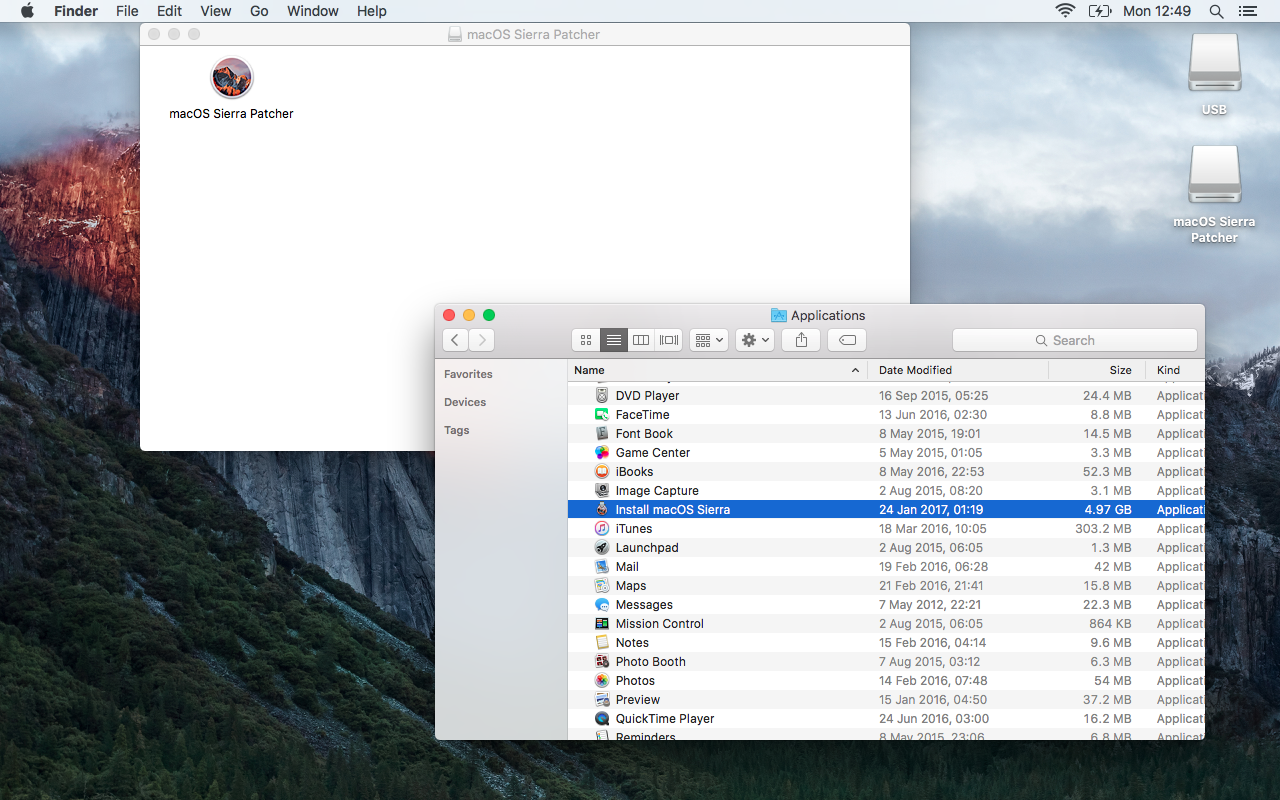
seven) When everything is ready, launch the macOS Sierra Patcher application.

Advertising
Advertising
8) In this awarding, click on the Sierra installation icon and specify the path to your copy of macOS Sierra in the / Applications directory.
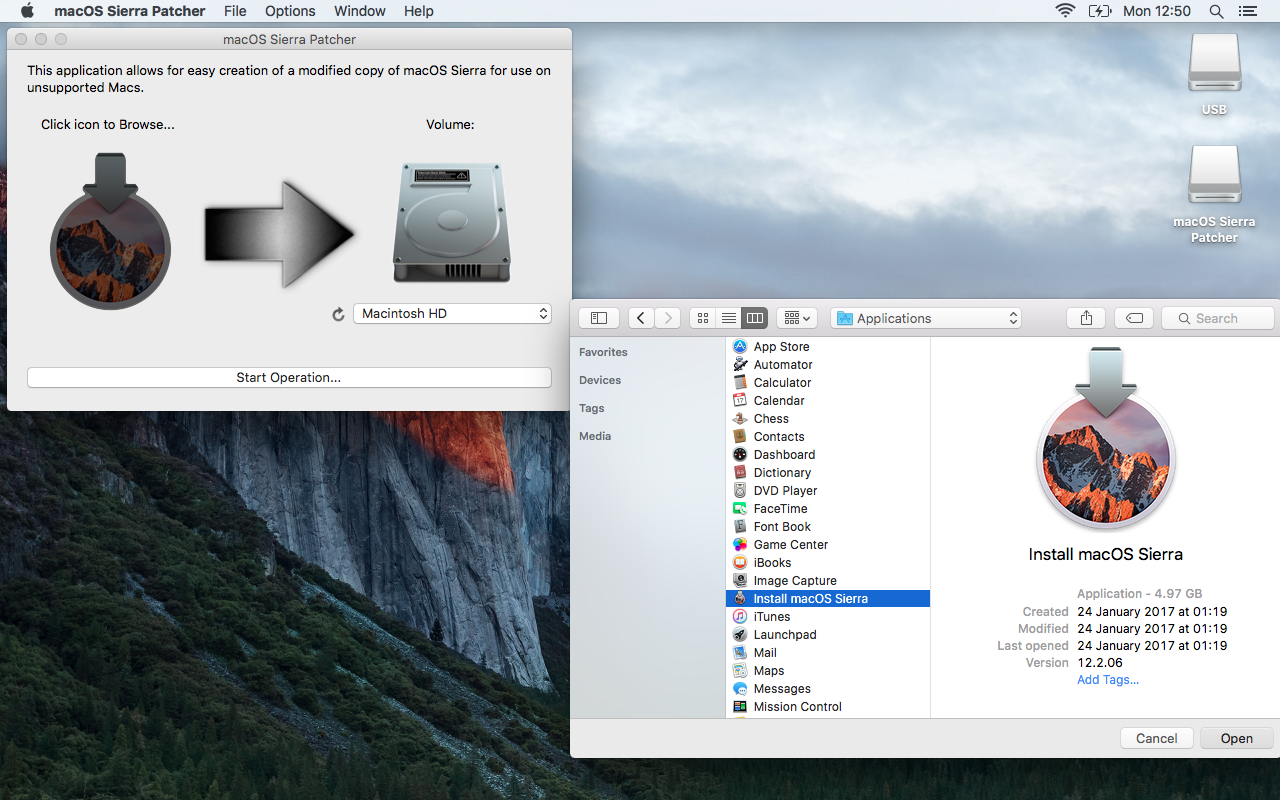

9) Click the Volume icon to select a partition to create a modified installer.
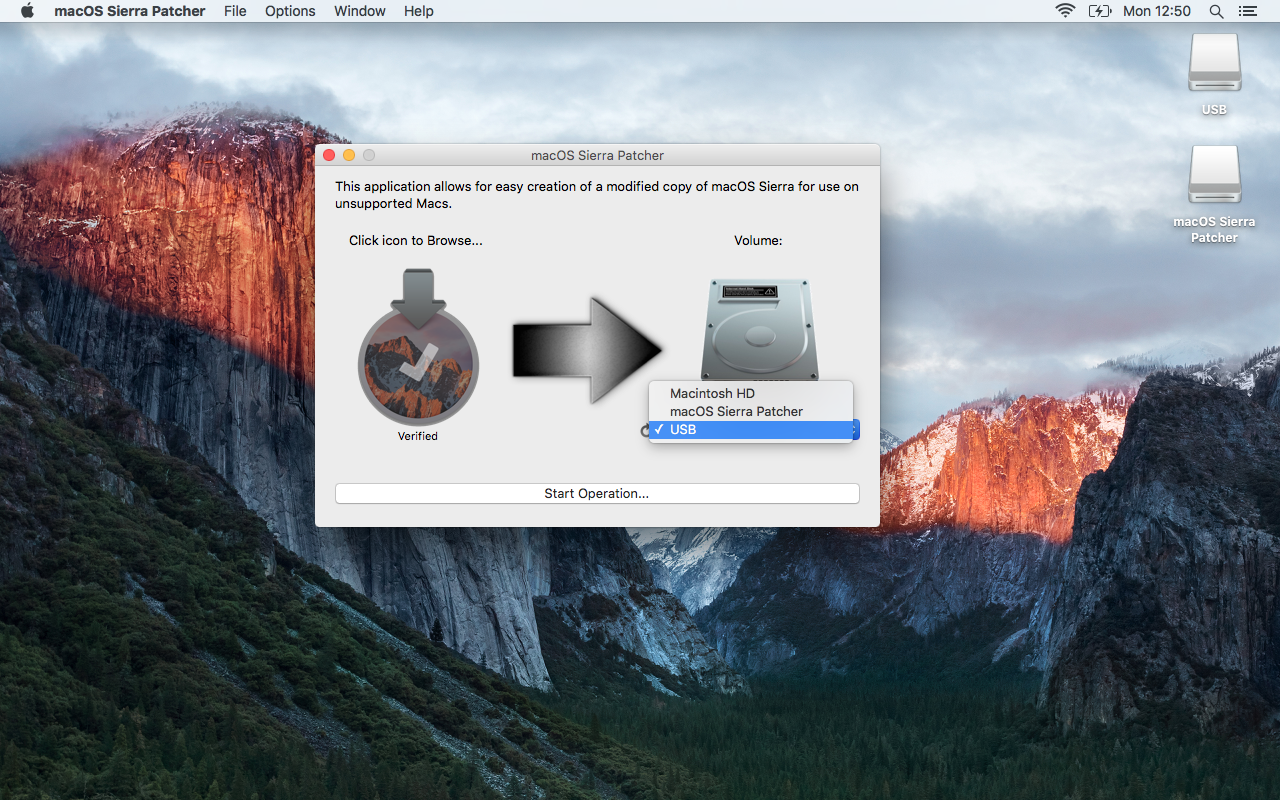

10) And so click "Start Operation ...". Enter the password upon request. Sierra Patcher volition create a modified macOS installer on the selected partitioning, which is able to work on unsupported devices.
Advertising
Advertising
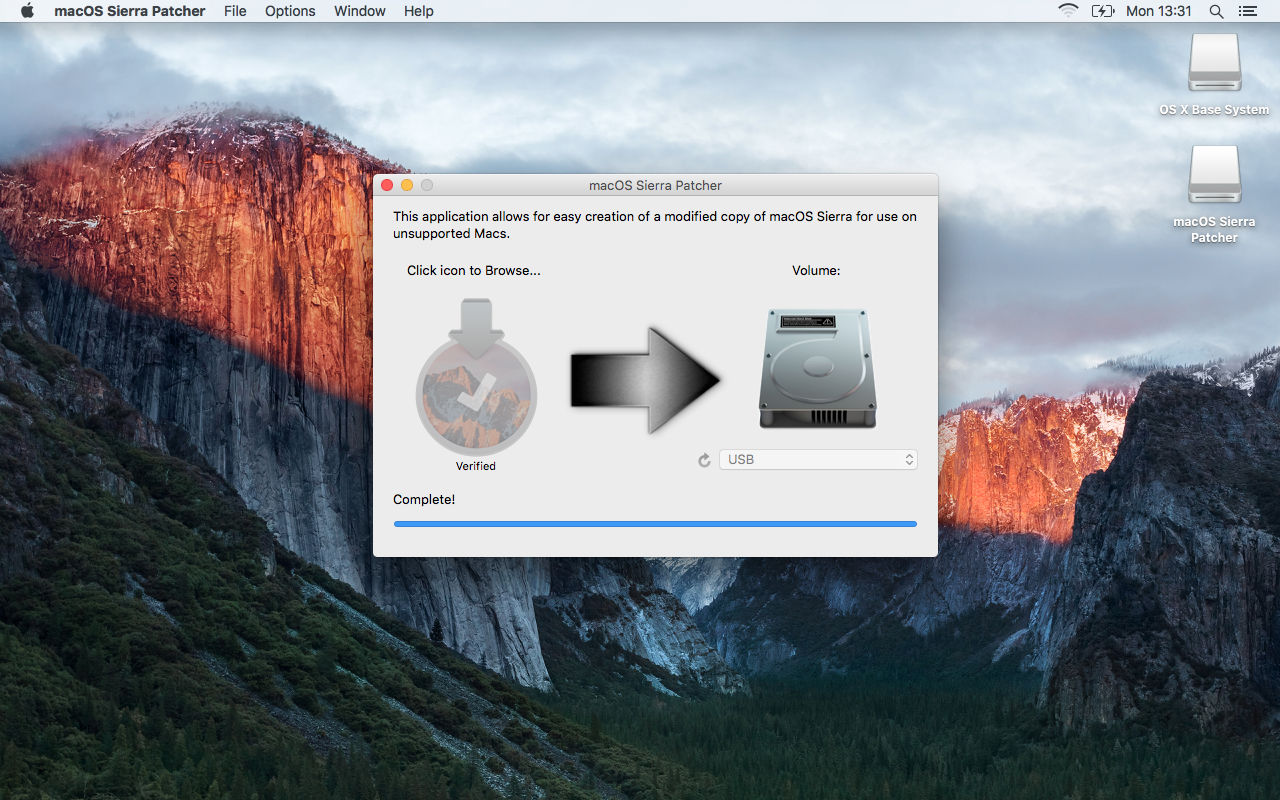

Afterwards creating the installer, Sierra Patcher will display Complete !. The disk sectionalisation or USB drive should at present be labeled "OS X Base of operations System" instead of the previous name.
11) Hold the Alt / Selection key while turning on the computer. This volition let you to choose a boot device - in our case, a USB drive.
12) Select the required device from the list to start downloading from it.
Advertising
Advertizement


13) Subsequently running macOS installer, follow itinstructions by selecting the hard drive of your computer as the partitioning where the installation volition be performed. If you are installing from scratch, use Disk Utility (located in the Utilities department of the installer) to clear the target partition first. This is recommended for a complete reinstall. Nevertheless, if you want to save an existing OS X installation or but upgrade, run the installer without clearing the deejay.
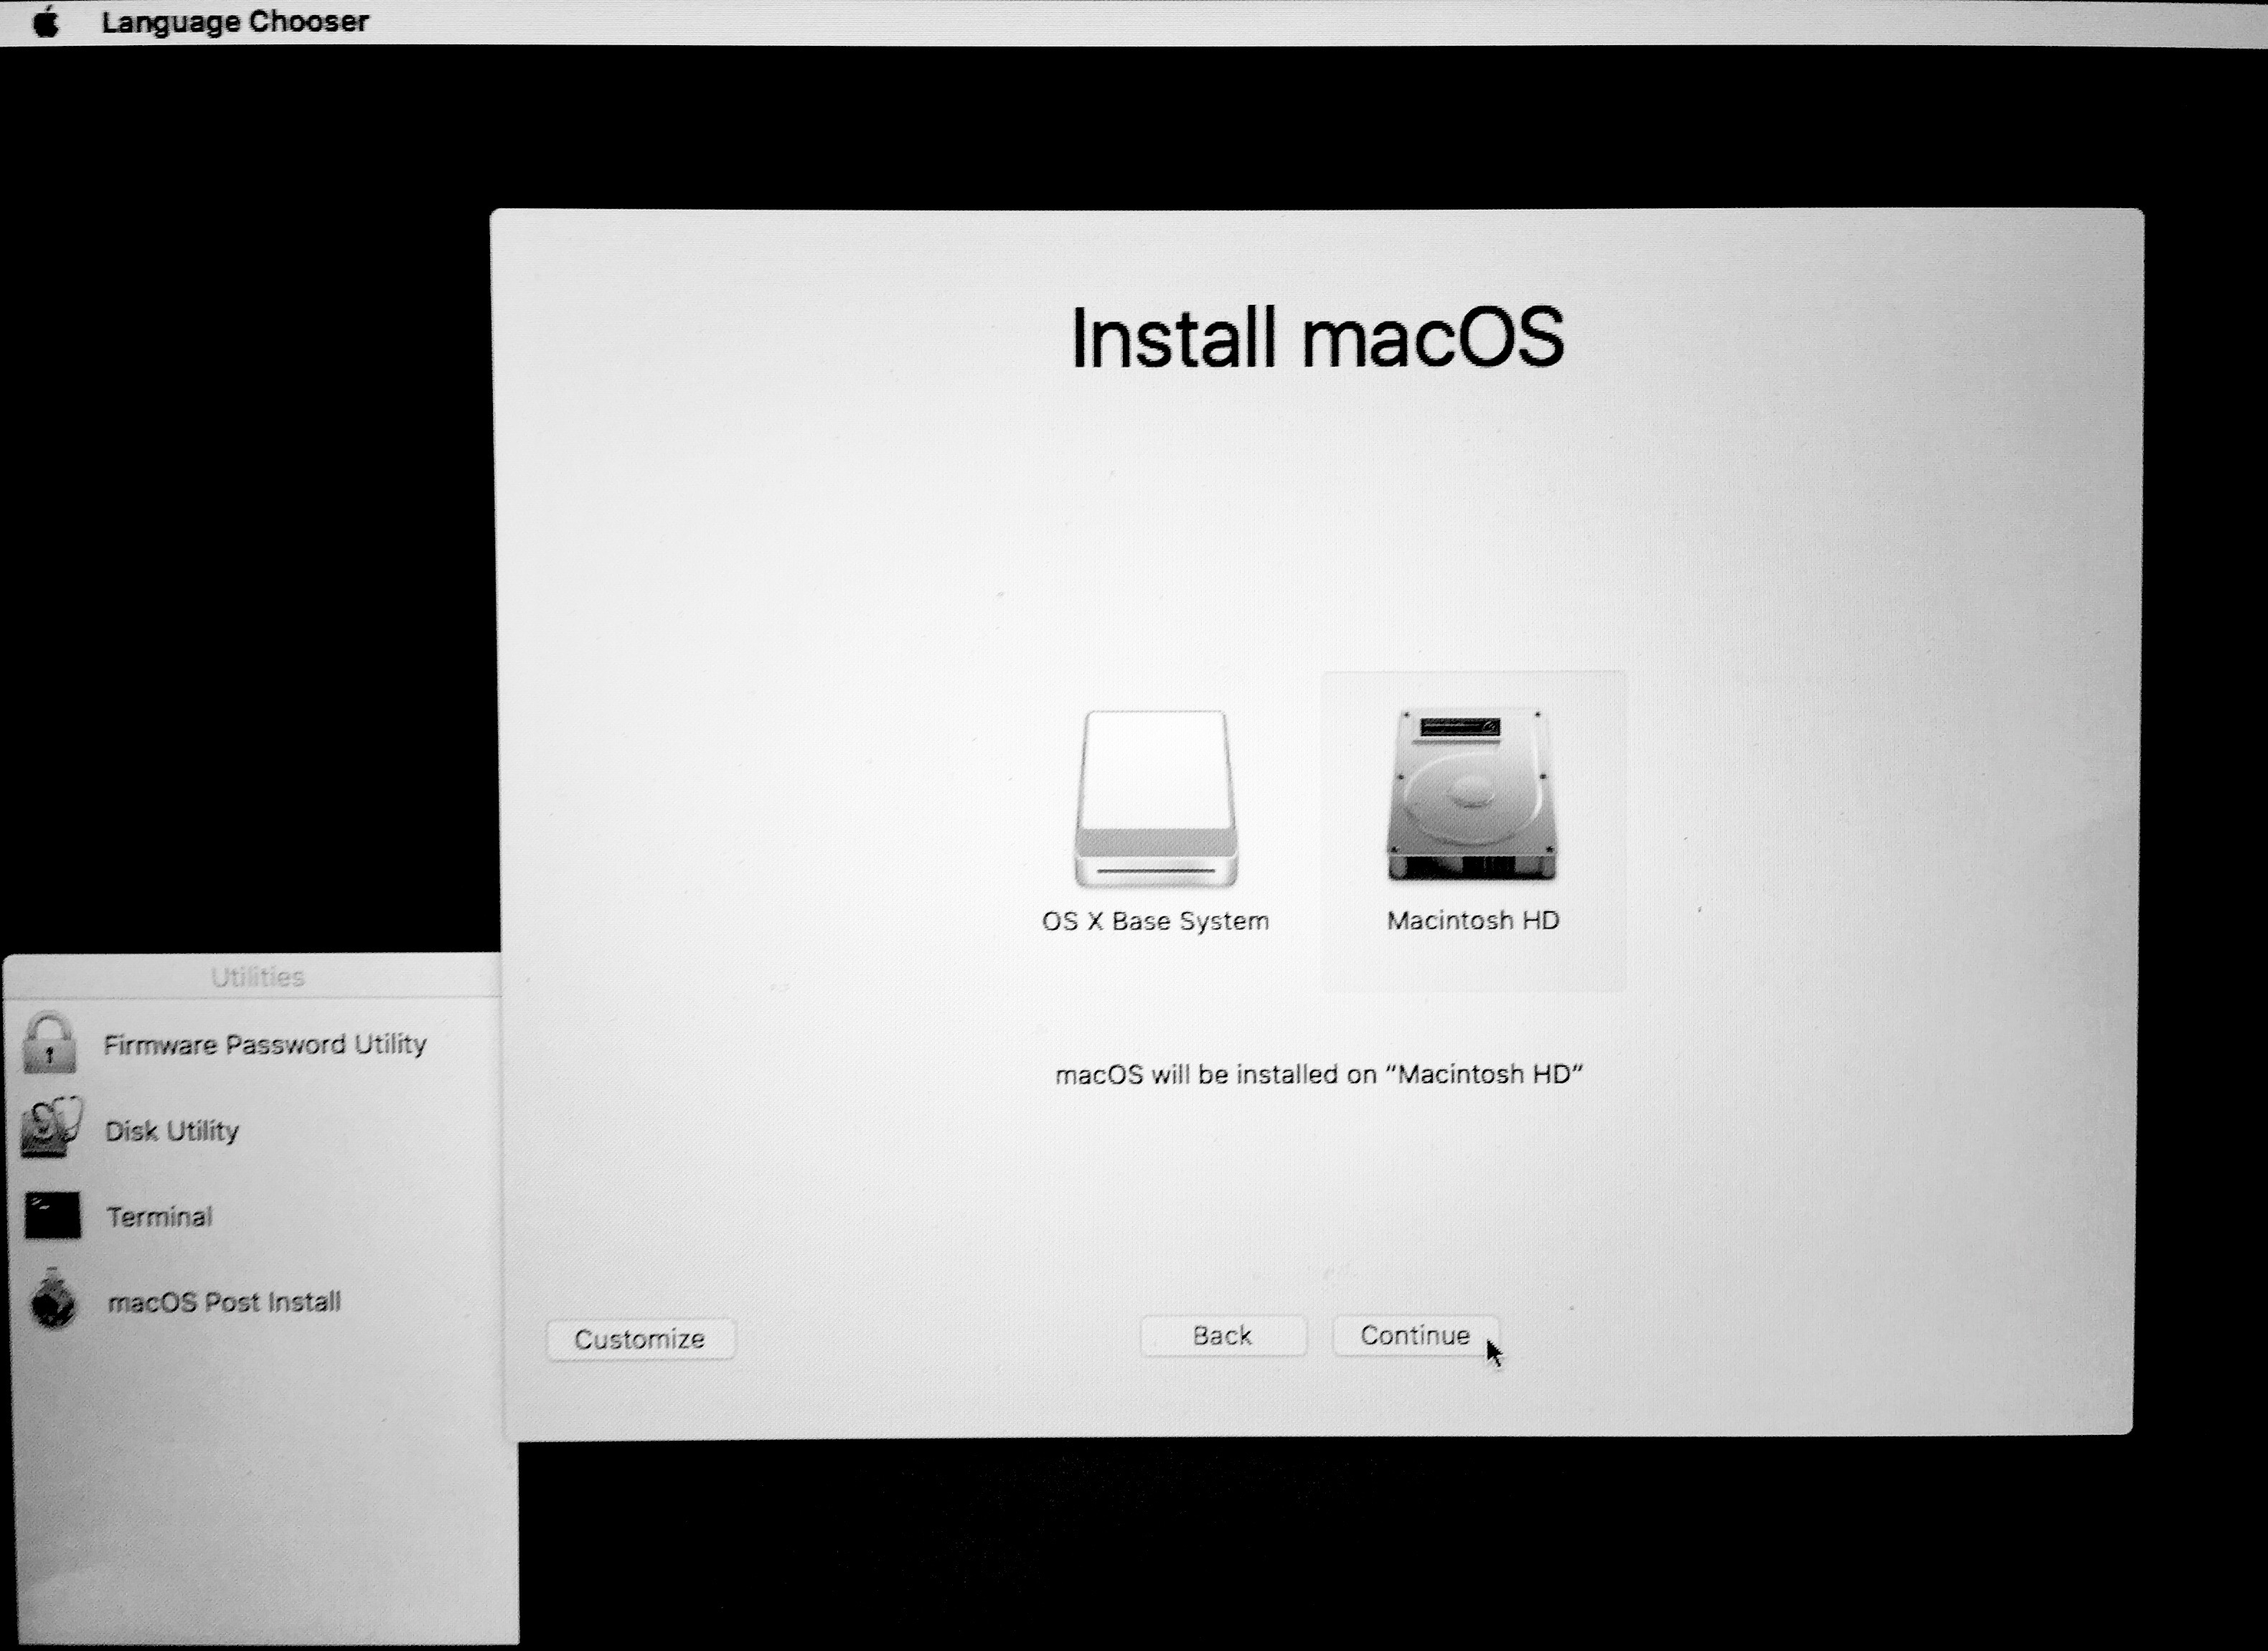

Now the installation should begin. Follow its progress, as in the middle of the process a reboot will occur, later on which your actions will be required.
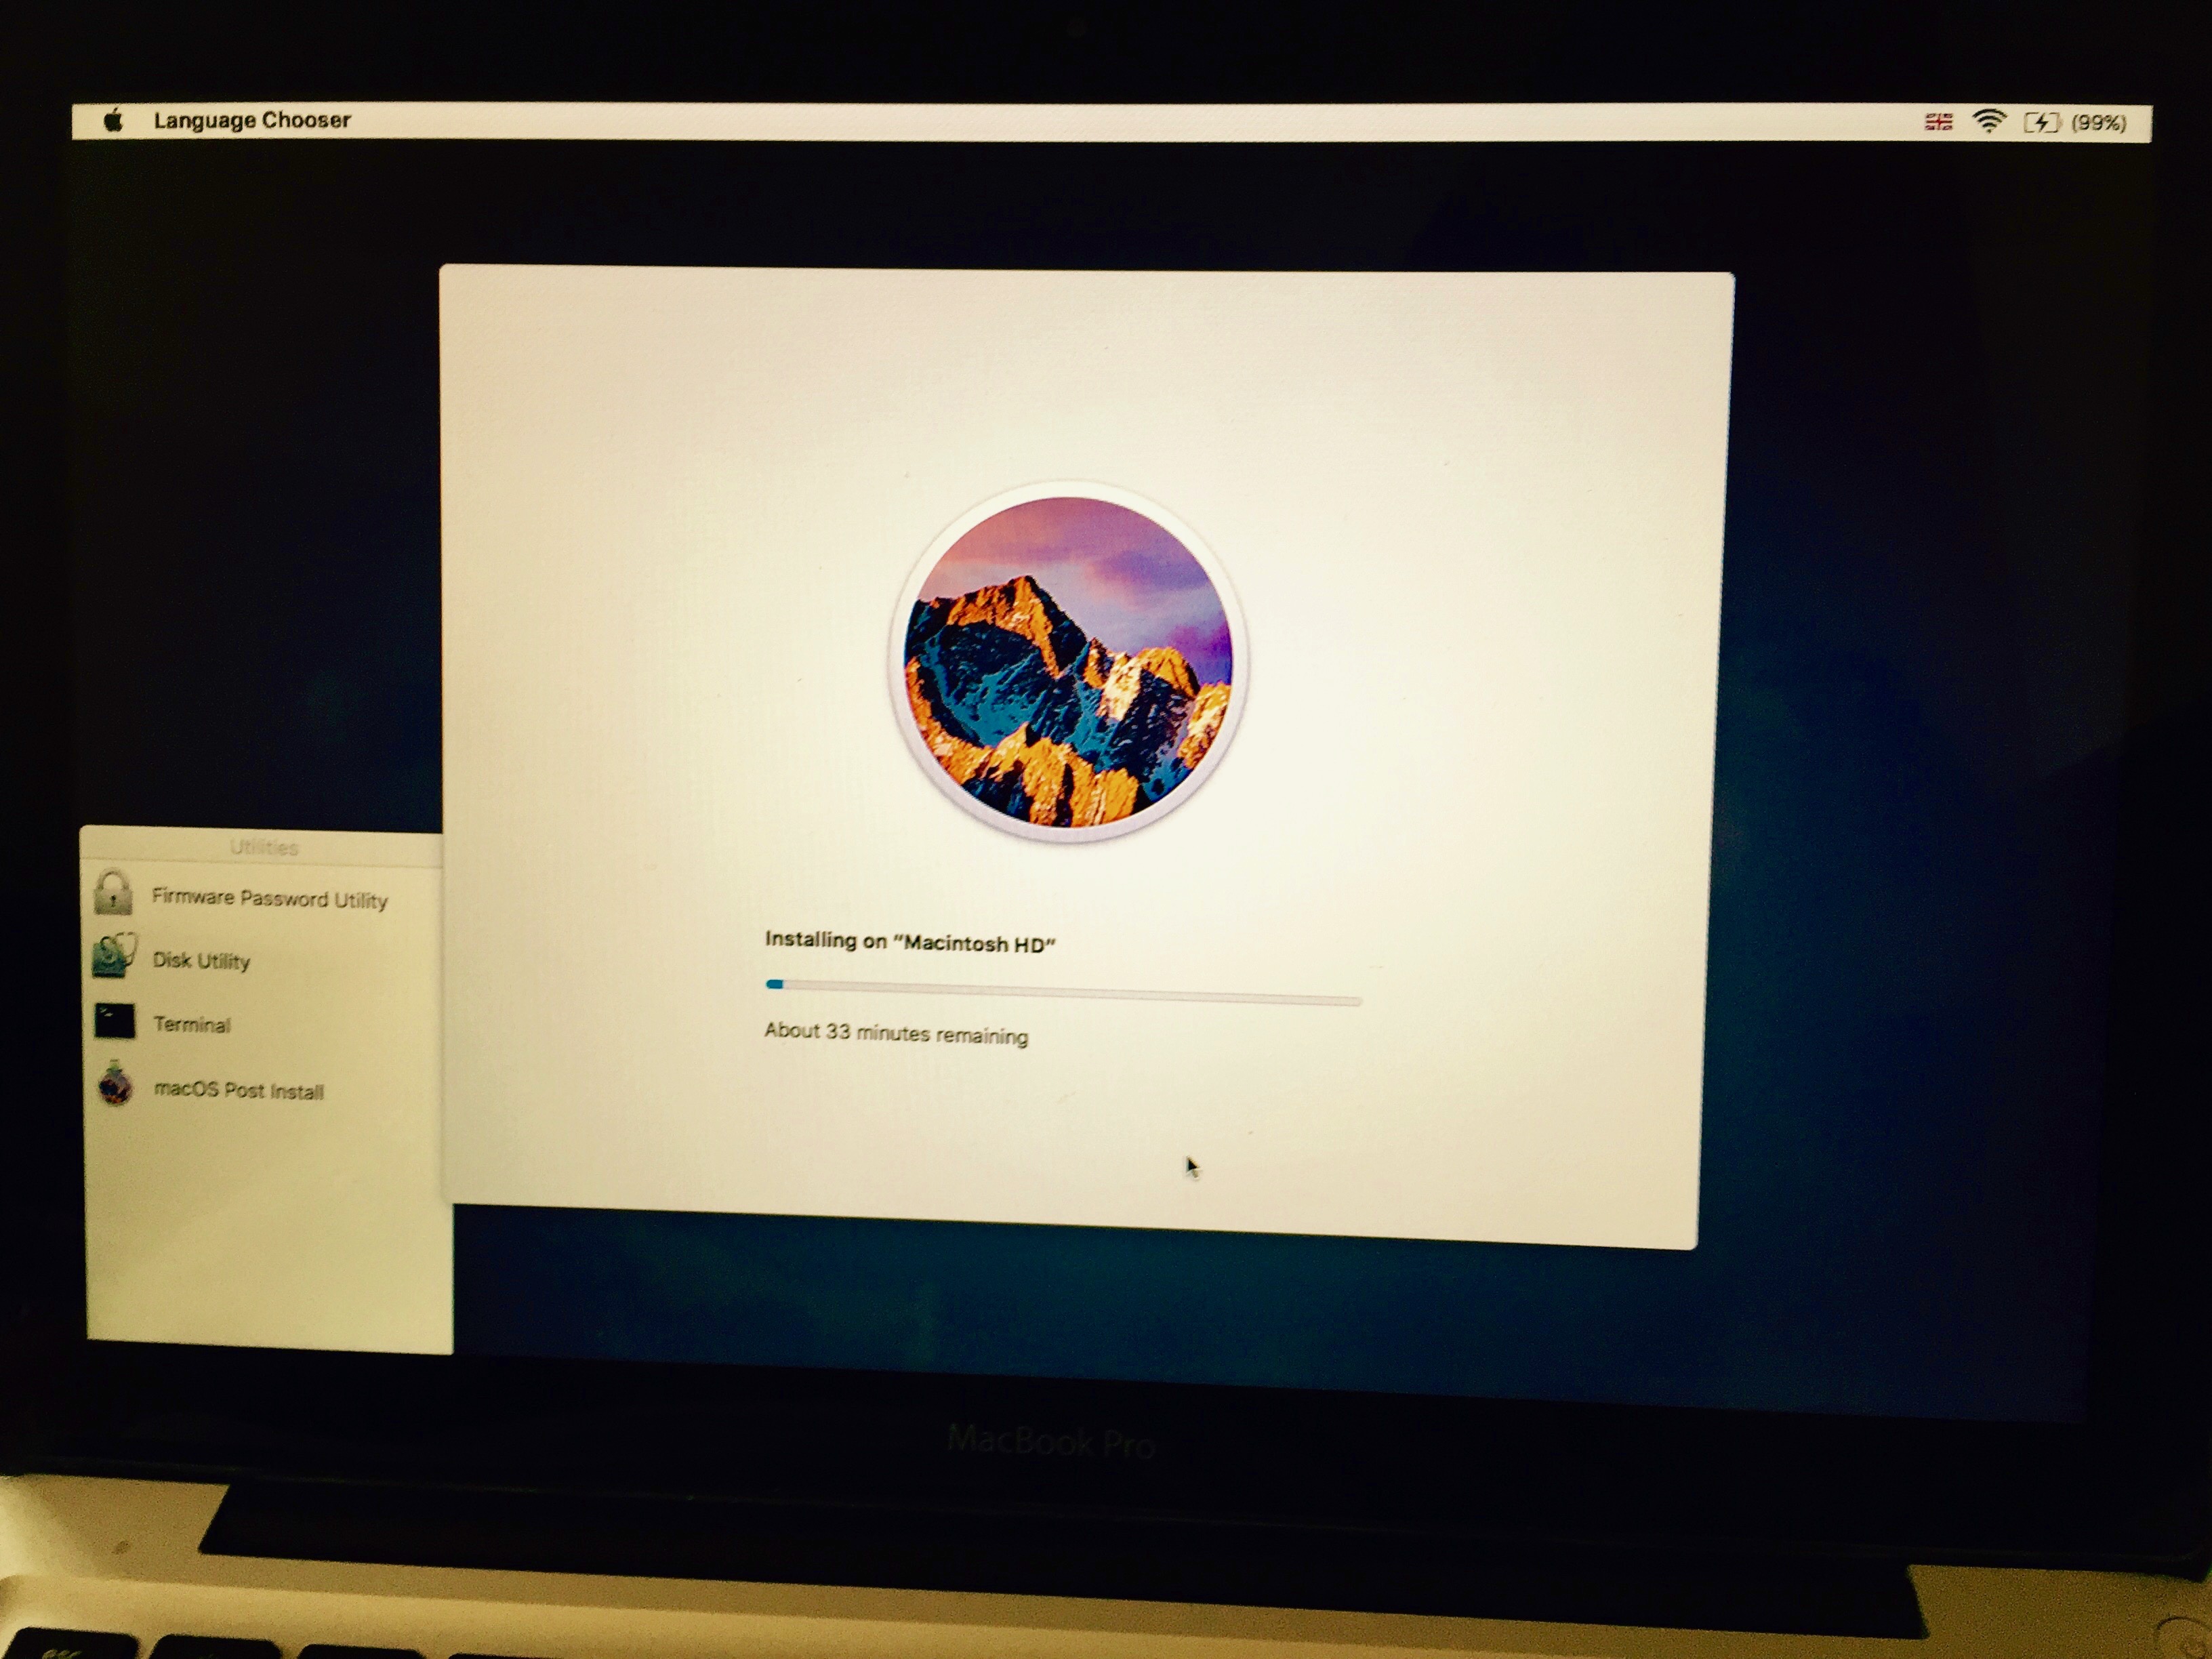

14) When the reboot starts, holdAlt / Selection key to open the boot device selection screen again. If yous miss the reboot, don't worry: the computer will try to boot, but it will not exist able to do this. Simply hold the power button until it turns off, and plow it on once more, remembering to concur the Alt / Pick push button.
xv) On the boot device selection screen, select the section with the installer over again.
16) After loading the installer, yous need to install patches that allow you to run Sierra. Instead of running the Install Sierra plan, select macOS Post Install.
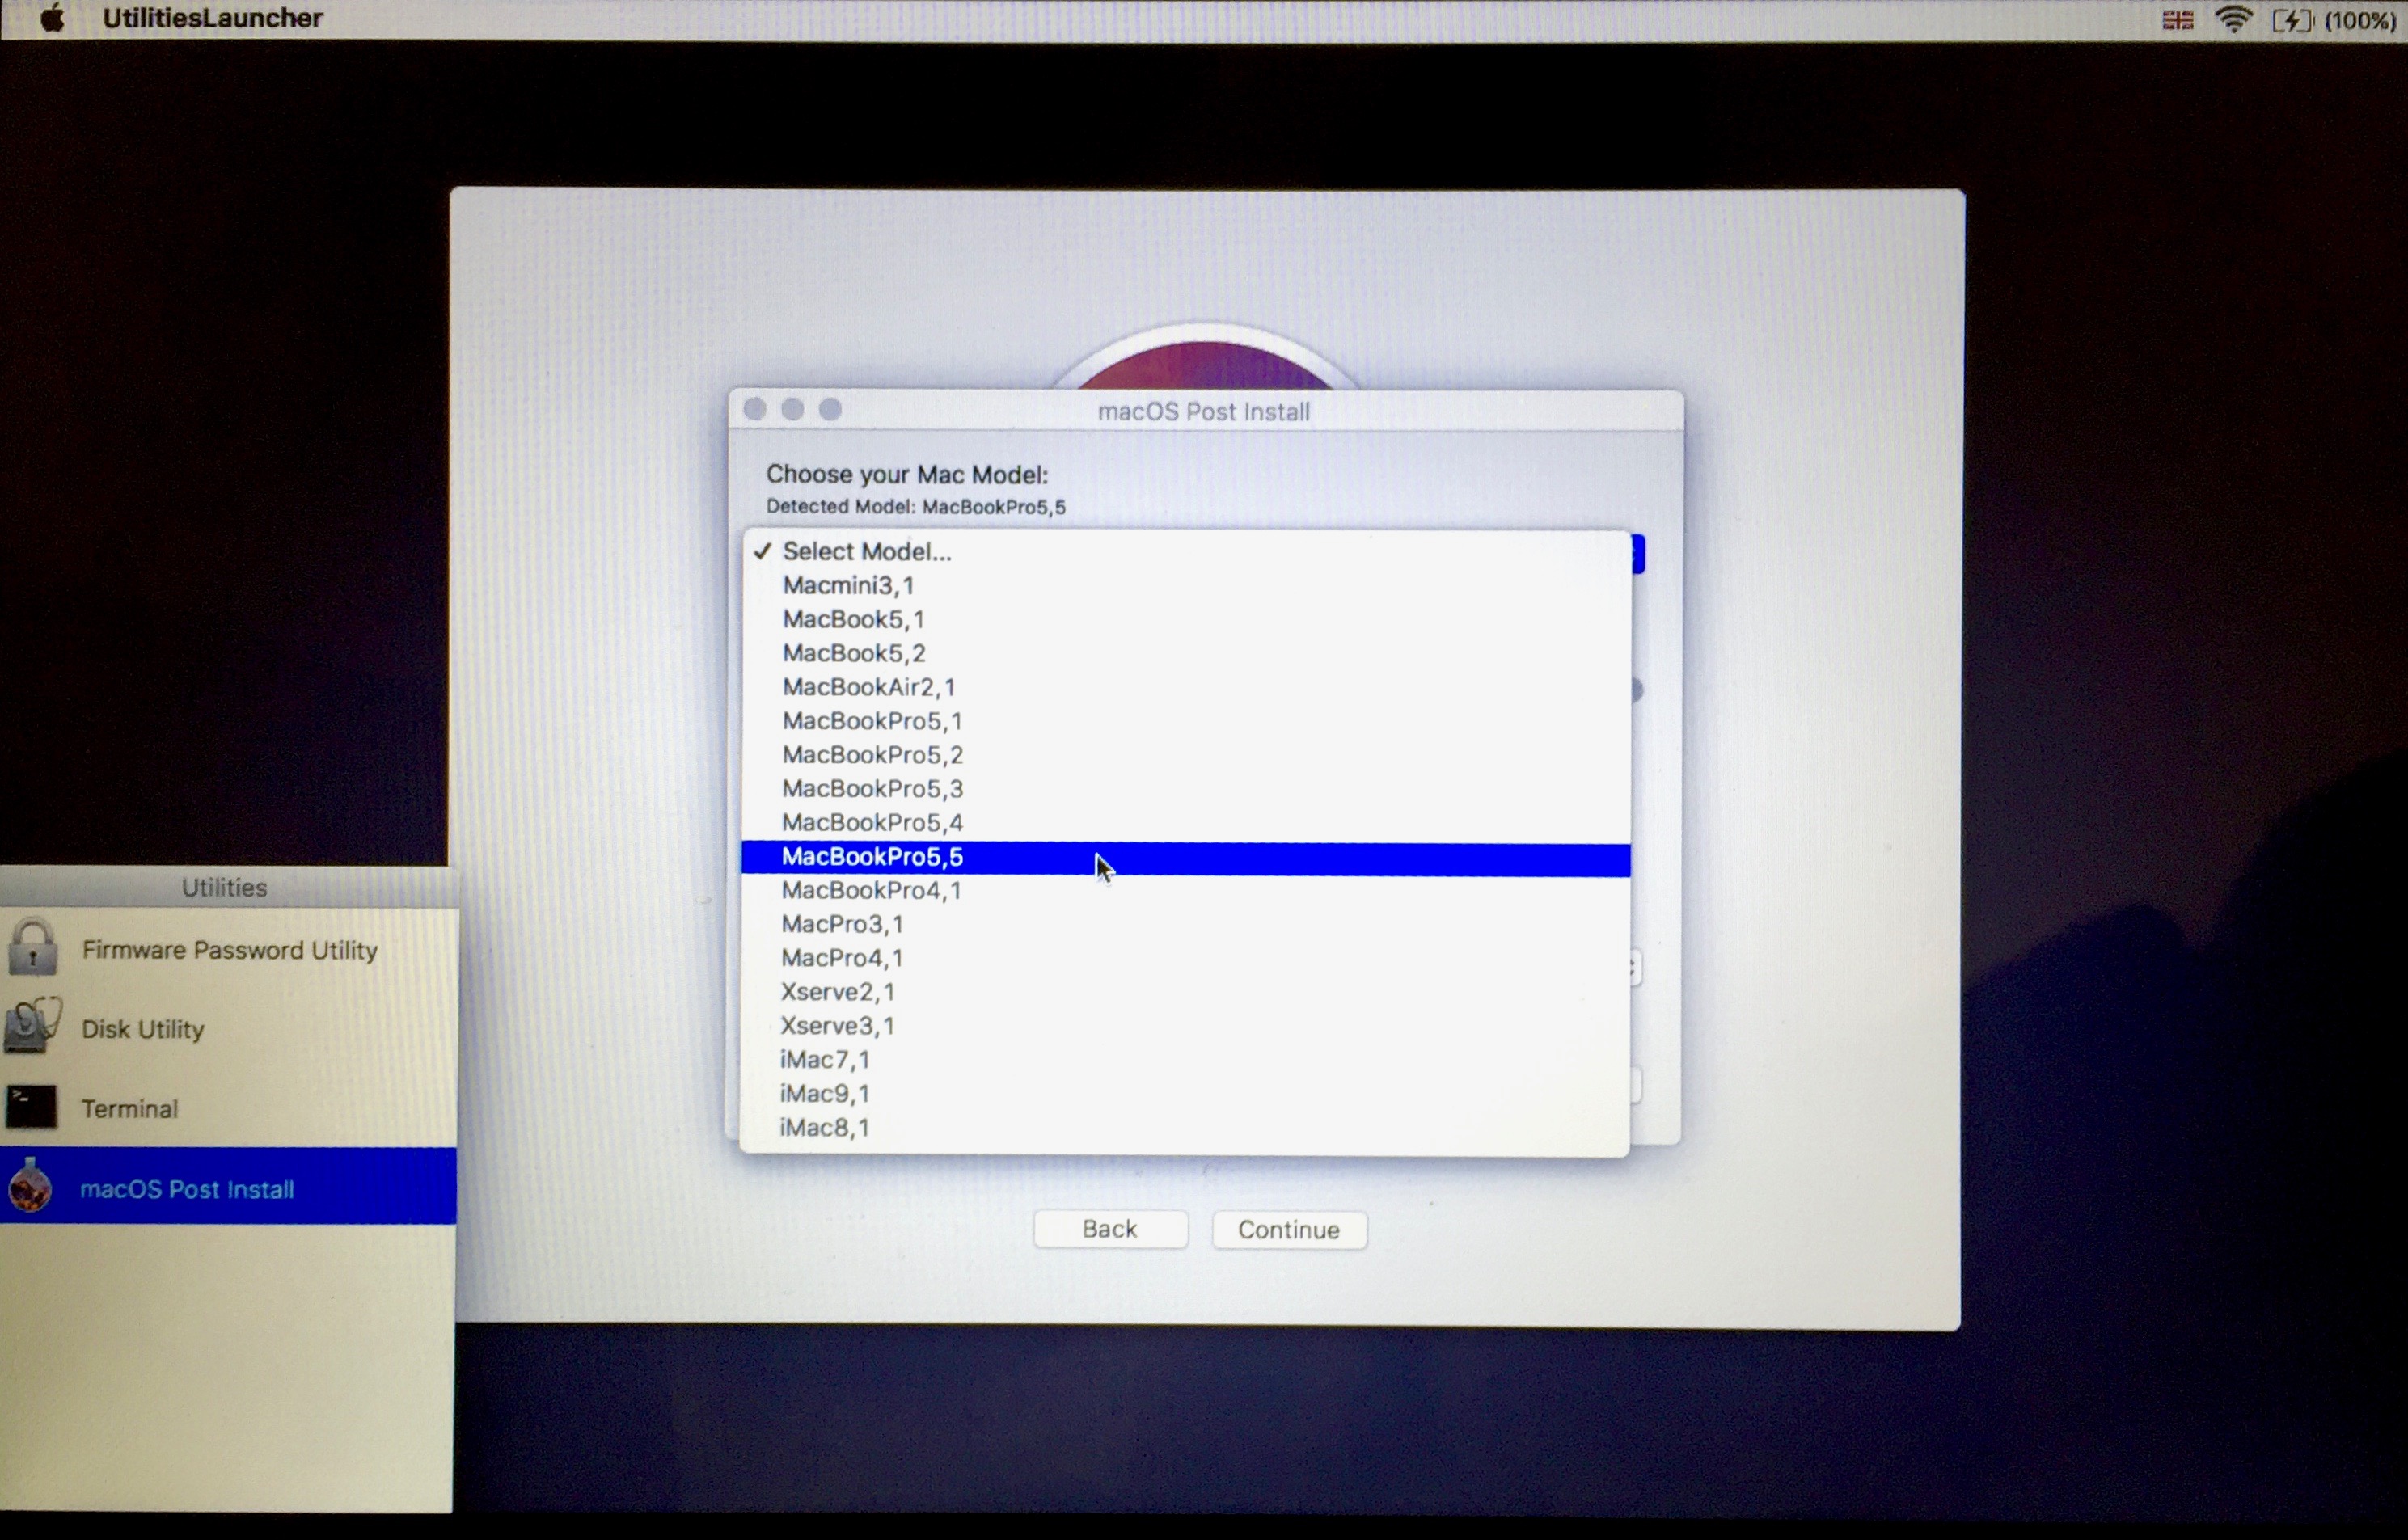

17) Post Install should automaticallyidentify your Mac model. Bank check that it is defined correctly; if it is non, select your option from the driblet-down list. Our MacBookPro 5.5 software detected correctly. If you are not sure which model you have, expect for information technology by name and year of release, or use Mactracker for Mac or iOS.
18) After choosing the right model, the programwill automatically select the most relevant patches for your automobile. If you are not certain what you are doing, exercise not change anything. We tin can recommend Recovery Sectionalisation Patch, which makes it possible to boot from the recovery partition. This is the only necessary patch non included by default.
nineteen) Make sure the partition you are oninstall patches - this is the section of your Mac on which you burned the OS. Do not install them on a USB partition or elsewhere. After that, click the button to install the patches and reboot. Please note that you do not need to check "Force Cache Rebuild" equally shown. This option is only useful in cases where your patches for some reason practise non piece of work.
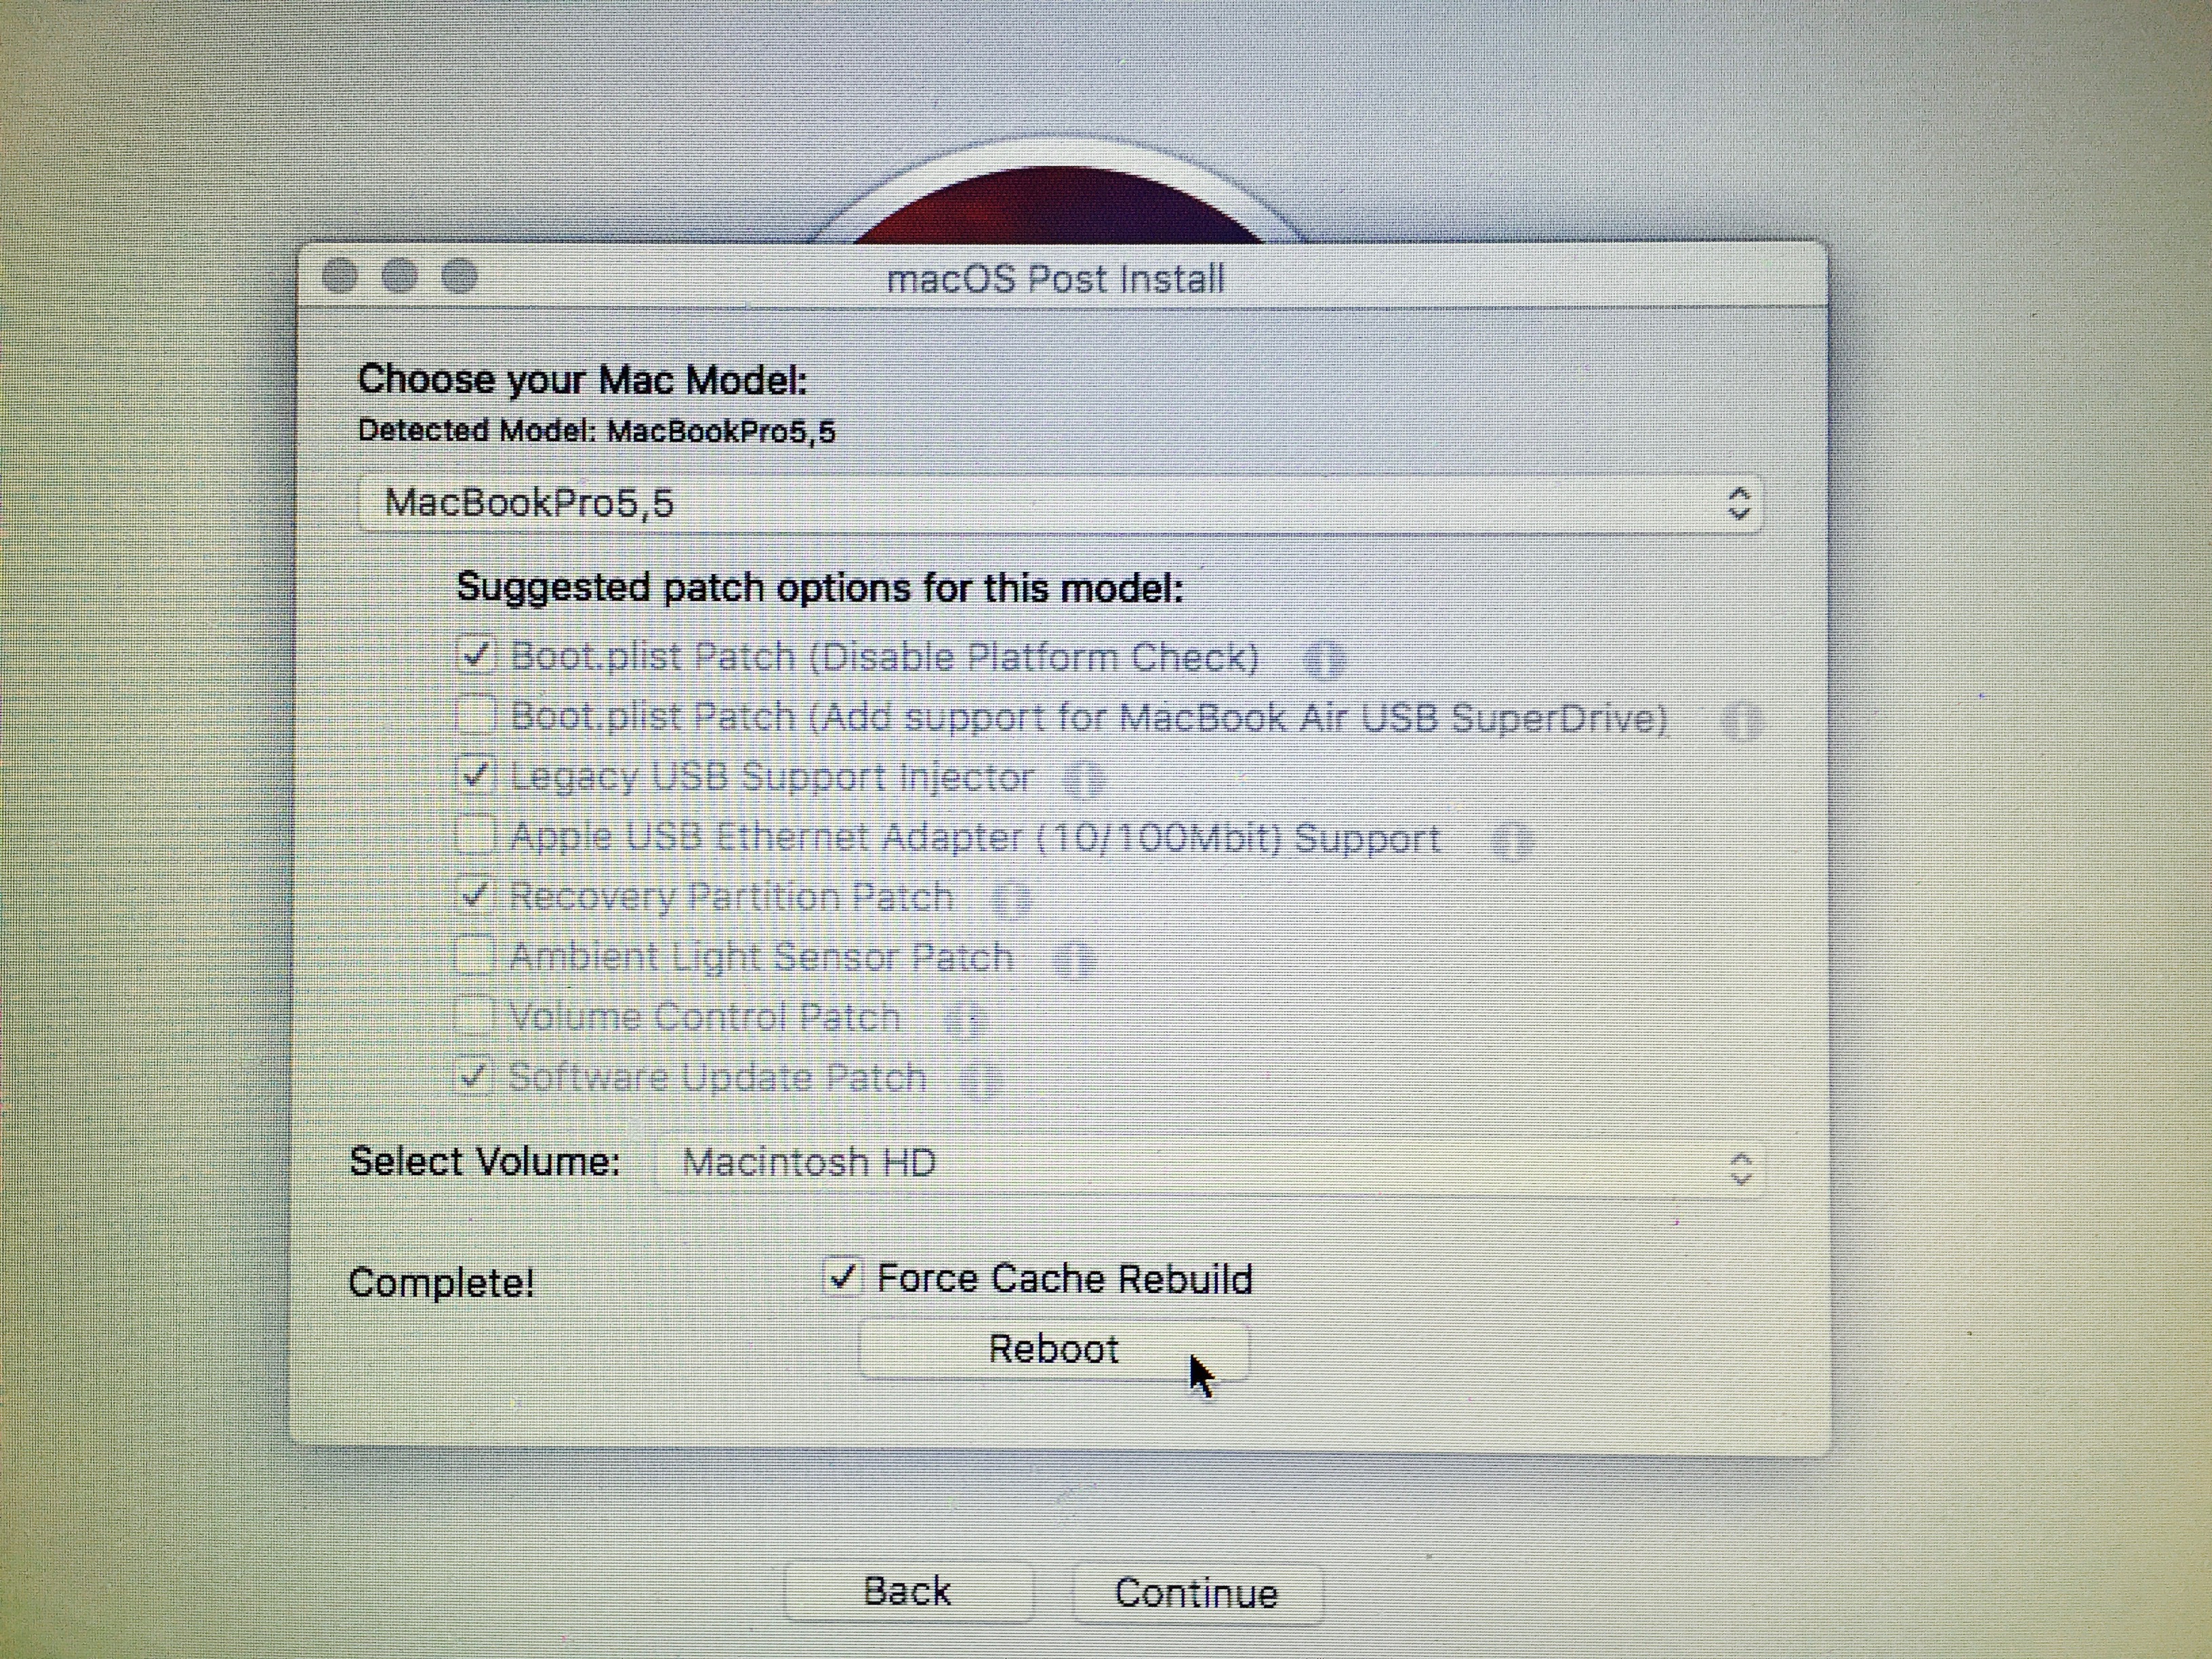

xx) During the last reboot, concord downwardly the Alt / Pick key. This fourth dimension, instead of the installation section, select the target where you installed the organisation. Ours is chosen Macintosh Hd.
Now the reckoner will kick and complete the installation. Ostend its completion. You volition receive a new Sierra installation on your de jure unsupported Mac. If some things like Wi-Fi and USB do not work later on the installation, download the installation section again and use patches over again.
It's all!
Patcher is still being updated, which gives hopeon the possibility of working with future versions of Sierra. It seems that most El Capitan users will however be able to upgrade: everything, including Siri, works great on our MacBook Pro 13 ″ 2009 release. A recent update to the tool even immune you to receive macOS updates through the AppStore.
Important! If yous are using hackintosh instead of realMac, there is no demand for a patch. All that is required is to reject to use SMBIOS, afterward which the figurer volition be recognized as a supported device. Patcher is needed only for mill MacBooks.
Using a Mac incompatible with Sierra? Let me know in the comments if the instruction allows him to start a new life.
Facebook Notice for European union! You need to login to view and post FB Comments!
Mac Os X 10.12 Download
Posted by: vickershistiamseent.blogspot.com
Post a Comment